

Fitting a roof to a pergola is a weekend job for one or two people, and nearly all of it forgives mistakes. Three things do not. Fall, expansion gaps and fastener positions are decided early, and getting any of them wrong means either taking the roof back off or living with it. Everything else on this page can be adjusted afterwards. If the roof type is still open, pergola roof types compared settles that first. Those three cannot, which is why the order below is what it is.
The three decisions you cannot undo
Read these before buying anything, because two of them change what you buy.
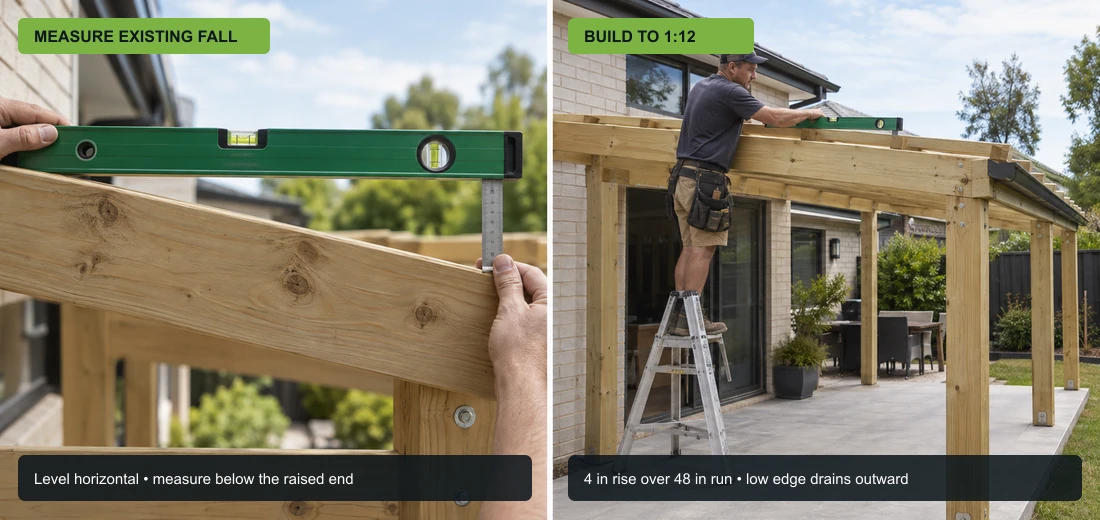
Fall comes first. Every sheeting product states a minimum pitch, and 1:12, which is about 5 degrees, is what most manufacturers specify. Below it, water sits on the panel instead of running off, and it sits on the fastener line. Adding fall to a finished roof means stripping the panels and packing or recutting the frame.
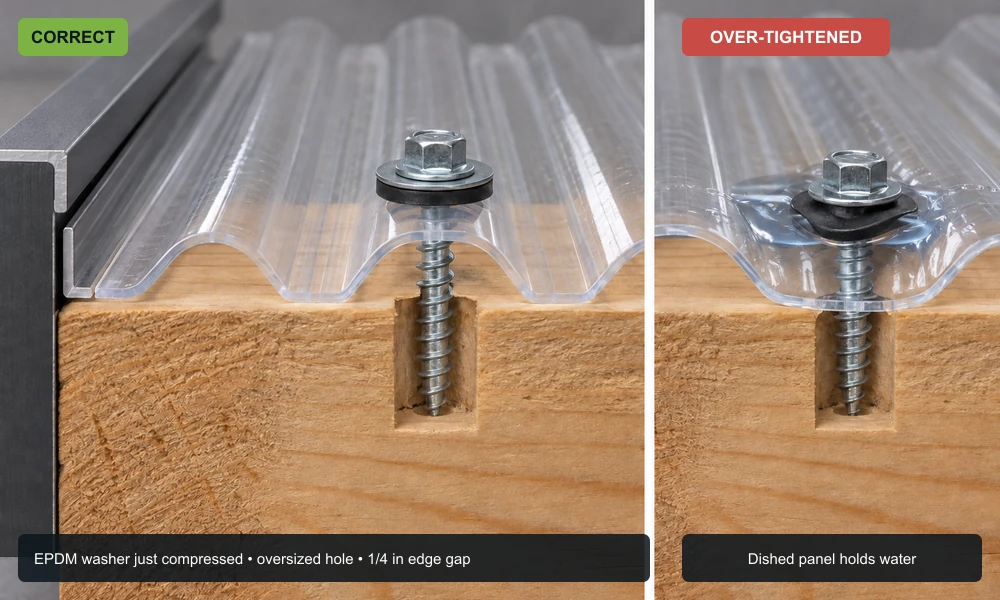
Expansion gaps come second. Polycarbonate is rated across a working range of minus 40 to plus 120 Celsius, and it moves through that range. Fixed hard against a stop, a panel that expands has nowhere to go and cracks at the fastener holes. The gap is 1/4 inch between panel edge and the stem of a T-track. There is no way to add it later.
Fastener positions come third. Every hole through a panel is a hole through your roof, sealed only by a washer. A hole drilled in the wrong place stays a hole. Plug it and you have a plug where water runs.
Everything from here is sequence, and the sequence exists to stop those three going wrong. Worth saying where this is written from: alux builds louvred systems where the roof and frame ship as one, so treat the DIY sections as a view from the other side of that fence.
| Step | Tools | Time | Fix it later? |
|---|---|---|---|
| 1. Check the frame | Tape, level, spade | 30 minutes | Yes, and cheaply if done now |
| 2. Set the fall | 48 inch level, saw or planer | 2 hours to plan, half a day to build | No |
| 3. Fit the purlins | Drill driver, chop saw, brush | An afternoon | Yes |
| 4. Lay and fix panels | Drill, step bit, fine blade, second person | Most of a day | Partly. Holes are permanent |
| 5. Close the edges | Snips, sealant, caulking gun | 2 hours | Yes |
| 6. Water off and away | Level, hacksaw, brackets | Half a day | Yes |
Only the last column matters when deciding where to slow down. Two of the six are worth measuring twice.
Step 1. Check what the frame will carry
Before the roof, the structure.
An open pergola was sized for its own weight plus wind passing between the rafters. A solid roof changes that: dead load rises with the panels and fixings, snow stops falling through the gaps, and wind meets a surface instead of slots. On an attached lean-to there is uplift along the leading edge as well.
Tools for this step: a tape, a spirit level and a spade if the footings need exposing. Half an hour.
Three measurements. Post section and footing depth, against what the panel supplier specifies for a covered structure of that size. Rafter spacing, against the panel you intend to buy. Squareness, because a frame that is out by an inch across a 12 foot bay will show along every panel lap.
Reversible? Yes, and cheaply, if you check now. Strengthening a frame before the panels go on is bracing or extra posts. Doing it afterwards means the roof comes off first.
Step 2. Set the fall
This is the step people skip and the one that ends up costing most.
Tools: a 48 inch level, a tape, and a circular saw or planer if you end up packing timbers. Two hours to measure and plan, half a day to build fall in.
Measure what you have with a 48 inch level. Rest it along the top of the frame, lift the low end until the bubble centres, and measure the gap underneath. One inch of lift over 48 inches works out at 1:48, which is nowhere near enough. You want 4 inches over 48 for 1:12. Take the reading in three places. Patios are laid to fall away from the house, and the frame does not always follow.
If the frame is level, there are three ways to build fall in. Pack the purlins with tapered timbers, which is the quickest and adds height at the high side. Recut or replace the top beam on one side, which is cleanest and most work. Or build a light secondary frame over the existing one, which suits a frame you do not want to alter.
Pitched roof pergolas are built around this from the start, which is worth reading if the frame is not up yet. The direction matters as much as the amount. Run the fall away from the house and away from any door, and make sure the low edge discharges somewhere you have thought about.
Reversible? No. This is decision one of three.
Step 3. Fit the purlins
The frame supports the panels, and rafters alone will not.
Tools: a drill driver, a chop saw, and a brush if you are painting first. An afternoon for a typical bay.
Panel manufacturers specify a support spacing, commonly 24 inches on centre for lighter sheet, 16 inches where spans open up. Pergola rafters usually sit wider than that, because they were laid out for appearance, not for carrying anything. Adding 2×3 purlins across the rafters is the standard fix and takes an afternoon.
Paint or finish the purlins before they go up. Painting timber at ground level takes a fraction of the time it takes overhead on a ladder, and the difference is measured in hours rather than minutes.
Set the purlins parallel to the fall line, so panels run down the slope and not across it.
Reversible? Yes. Purlins can be added or moved before panels go on.
Step 4. Lay and fix the panels
The longest step and the one with the most detail worth getting right.
Tools: a cordless drill, a step drill or a bit sized above the fastener, a fine-toothed blade for cutting, and a second pair of hands on anything above 8 feet. Most of a day.
Work out the lap direction before the first panel. Panels overlap away from the prevailing wind, so driven rain runs over the joint instead of into it. On a corrugated profile that means starting at the downwind end and working upwind.
Pre-drill every fastener hole. On a 12 by 16 foot roof in 26 inch corrugated sheet that is somewhere near 180 holes, so it is worth setting up a jig or marking a story stick instead of measuring each one. Panels are brittle at the edges and a screw driven straight through will crack a hole into a star. Drill the hole oversize, so the panel can move under the washer instead of gripping the screw.
Fastener spacing comes from the panel manufacturer, and it tightens at the eaves and the ridge, typically 12 inches there against 24 in the middle of the run. Use the washers supplied. A screw with a bonded washer, driven until the washer just compresses and no further, seals. Driven hard, it dishes the panel at the hole and creates a puddle.
Leave the 1/4 inch expansion gap at every edge that meets a fixed component.
Plan the route before you start fixing. Work back towards the ladder so you never have to cross finished panels, and clear the roof of offcuts and swarf as you go, because steel filings left on polycarbonate rust into the surface.
Reversible? Partly. Panels can be lifted and relaid. Holes cannot be undrilled.
Step 5. Close the edges
Where roofs leak is almost never in the middle.
Tools: a hacksaw or tin snips, sealant, and a caulking gun. Two hours.
Vertical closure strips fill the profile at the eave and ridge, keeping out wind-driven rain and wildlife. They cost a few dollars a metre and they are the single cheapest thing on this page that stops a callback. They are shaped to the panel profile and there is a matching pair for every corrugation type.
Barge or gable flashing covers the open edge along the sides. On an attached roof, the junction with the wall needs proper flashing tucked into a chase or under existing cladding, and not a bead of sealant along the top edge. Sealant alone is a two year solution.
Reversible? Yes, and edges are worth revisiting if anything shows up in the first winter.
Step 6. Get water off the roof and away from the posts
Four of the five guides in this category list water management as a step and none of them explains it.
A pergola roof has no gutters unless you fit them, and a bare edge discharges the entire roof area along one line. A 12 by 16 foot roof sheds 192 square feet of rainfall along one edge, and that edge is normally over the paving at the foot of a post.
Two consequences follow. Splash-back marks the posts and, on timber, keeps the base wet through the season, which is where rot starts. And concentrated discharge scours a channel in gravel or lifts a paver over a couple of winters.
Tools: a level, a hacksaw and brackets to suit. Half a day.
Fitting a gutter along the low edge solves both. Size it to the roof area, run it to a downpipe at one end, and take the discharge at least 3 feet from any post base. A soakaway or a border bed will take it. A downpipe ending on the paving just moves the problem 3 feet.
If a gutter is not wanted for appearance, a gravel drip strip along the discharge line takes the energy out of the fall and stops the scour, though it does nothing about splash-back. Integrated systems avoid the question altogether, routing water through the beam and down a hollow post. alux does it that way and so do most louvre manufacturers. It is one of the few genuine advantages of buying roof and frame together.
Reversible? Yes. Gutters can be added at any time, which is why this step gets left out and then done later anyway.
What changes by panel type
The sequence holds. The numbers move.
Polycarbonate is the DIY default. Light enough to handle alone, cuts with a fine-toothed blade, and the most sensitive to expansion of the three. It wants the full 1/4 inch gap and oversize holes.
Metal sheeting is heavier and stiffer, more forgiving on expansion and less forgiving on handling: a panel caught by wind on a ladder is dangerous. Minimum pitch is 3:12 for profiles with exposed fixings, considerably steeper than polycarbonate, so check before assuming your fall is enough.
Adjustable louvres are not a panel you fit to a frame. The blades, the linkage, the drive and the drainage are one system, and the frame is part of it, which is why alux supplies them as a complete structure. There is no retrofit route here and pricing sits in a different bracket. Louvered pergola installation covers what that process actually involves.
The practical difference for anyone comparing routes: with sheet you buy a product and take on the fall, the purlins, the fixings and the drainage. With a louvre system those are somebody else’s problem and somebody else’s warranty, and the pergola with roof range shows where each route lands. That is most of what the price gap buys.
When it stops being a DIY job
Four situations, and they are worth recognising before the tools come out.
A timber roof with sheathing and shingles adds serious dead load and changes how wind acts on the structure. That is a framing job with a load calculation behind it.
Anything motorised brings mains wiring outdoors, and in most jurisdictions that is notifiable work.
An attached roof needs the wall junction flashed properly, which means cutting a chase or lifting cladding. Done badly it puts water into the wall instead of off the roof, and the damage is inside where you cannot see it.
Adding a solid roof counts as a change of use for planning purposes in many areas, at which point setbacks and permits apply. Fabric sits outside that. A fixed roof often does not.
If any of these apply, the sensible route is a supplier who takes the structure and the roof as one responsibility. That is worth asking about directly, since plenty of companies sell a roof and leave the frame to you. alux works this way through its OEM and ODM programme. Most louvre manufacturers work this way, because a roof and the frame under it fail as a pair.